Remove the Background
The qualities of this image are such that no single technique is going to be very effective. The background is so close in color to parts of the girl's blouse that it makes the background eraser difficult to work with. The bottom half of the image is simple enough that the pen tool would be ideal, but the girl's hair presents some problems. I decided to use a combination of techniques; first, expanding on the channels trick used in the fireworks example and using levels to refine the mask, and then using the pen tool to isolate the girl's arms and sleeves to further refine the mask for the lower portion of the image. The entire process took approximately twenty minutes.

I started out by drawing a loose selection around the girl's hair with the freehand lasso tool.

 Next I looked at the individual color channels to find the one that had the most contrast. You can see from the thumbnails to the right that the red channel clearly has the most contrast. So initially we'll use a duplicate of the red channel to create our alpha channel mask.
In the channels palette, drag the red channel to the new channel button to create a duplicate.

A duplicate channel is created and named Alpha 1. This is what we'll be working with as a selection mask.
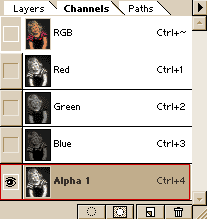
The loose selection we made with the lasso tool should still be active and we want to be working only in the Alpha 1 channel.

Go to Image > Adjust > Levels to bring up the levels adjustment dialog. Drag the left and right sliders under the histogram toward the center...

...just enough that you increase the contrast as much as possible without loosing the fine wisps of hair. When you start to loose the strands of hair, you'll need to back off some and stop there.

Next you can make another selection and adjust the levels again to increase the contrast even more. You can select different areas and repeat this as needed to make the best possible selection.

Once you've gone as far as you think you can with the levels adjustments, use the paintbrush to fill in the rest of the face and hair with white. Take care not to go to far out to the edge and paint away the fine strands of hair. I got a little too close here on the left side of the girl's head.

Once the face is filled in, we can switch to a larger brush and fill in the lower part of the girls dress and arms.

see how the mask was completed for the bottom portion of the image.

After the rough outline is drawn, the curves are refined with the convert anchor point tool.

The path is then converted to a selection using the same method that was used in the butterfly example.
The the selection is filled with white. (Edit > Fill)

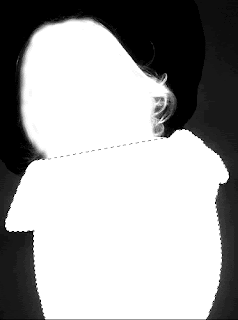
Now we'll need to do another levels adjustment to shift the remaining dark gray areas to 100% black. But we don't want to effect the hair area because it has shades of gray we need to keep. So, first we'll lasso a loose selection around the hair, then invert the selection.

With the inverted selection, we can go to Image > Adjust > Levels and move the left slider in until the surrounding dark gray becomes completely black. We now have a selection mask saved as an alpha channel!

Click the RGB channel in the channels palette to return the view to the full color image. Next go to Selections > Load Selection. In the dialog box, choose the Alpha 1 channel as the source and click OK.

Here you can see the selection marquee around the image.

As always, I switch to quick mask mode to have a look at the selection mask. You can learn more about quick mask mode on page two of the leaf example
 .
.
While in quick mask mode, I usually apply a half-pixel gaussian blur just to soften the mask the slightest bit.

Next I switch back to selection mode, invert the selection and delete the background
 .
.
Here is the final image with a new background.

I hope this series of tutorials showed you that there's never one way to approach a problem. Sometimes it takes creative thinking and a combination of techniques, but with practice and a wide variety of tools I'm confident that anyone can handle even the toughest of background removing challenges.
The qualities of this image are such that no single technique is going to be very effective. The background is so close in color to parts of the girl's blouse that it makes the background eraser difficult to work with. The bottom half of the image is simple enough that the pen tool would be ideal, but the girl's hair presents some problems. I decided to use a combination of techniques; first, expanding on the channels trick used in the fireworks example and using levels to refine the mask, and then using the pen tool to isolate the girl's arms and sleeves to further refine the mask for the lower portion of the image. The entire process took approximately twenty minutes.

I started out by drawing a loose selection around the girl's hair with the freehand lasso tool.


In the channels palette, drag the red channel to the new channel button to create a duplicate.
A duplicate channel is created and named Alpha 1. This is what we'll be working with as a selection mask.
The loose selection we made with the lasso tool should still be active and we want to be working only in the Alpha 1 channel.

Go to Image > Adjust > Levels to bring up the levels adjustment dialog. Drag the left and right sliders under the histogram toward the center...

...just enough that you increase the contrast as much as possible without loosing the fine wisps of hair. When you start to loose the strands of hair, you'll need to back off some and stop there.

Next you can make another selection and adjust the levels again to increase the contrast even more. You can select different areas and repeat this as needed to make the best possible selection.

Once you've gone as far as you think you can with the levels adjustments, use the paintbrush to fill in the rest of the face and hair with white. Take care not to go to far out to the edge and paint away the fine strands of hair. I got a little too close here on the left side of the girl's head.

Once the face is filled in, we can switch to a larger brush and fill in the lower part of the girls dress and arms.

see how the mask was completed for the bottom portion of the image.

After the rough outline is drawn, the curves are refined with the convert anchor point tool.

The path is then converted to a selection using the same method that was used in the butterfly example.
The the selection is filled with white. (Edit > Fill)

Now we'll need to do another levels adjustment to shift the remaining dark gray areas to 100% black. But we don't want to effect the hair area because it has shades of gray we need to keep. So, first we'll lasso a loose selection around the hair, then invert the selection.

With the inverted selection, we can go to Image > Adjust > Levels and move the left slider in until the surrounding dark gray becomes completely black. We now have a selection mask saved as an alpha channel!

Click the RGB channel in the channels palette to return the view to the full color image. Next go to Selections > Load Selection. In the dialog box, choose the Alpha 1 channel as the source and click OK.

Here you can see the selection marquee around the image.

As always, I switch to quick mask mode to have a look at the selection mask. You can learn more about quick mask mode on page two of the leaf example

While in quick mask mode, I usually apply a half-pixel gaussian blur just to soften the mask the slightest bit.
Next I switch back to selection mode, invert the selection and delete the background

Here is the final image with a new background.

I hope this series of tutorials showed you that there's never one way to approach a problem. Sometimes it takes creative thinking and a combination of techniques, but with practice and a wide variety of tools I'm confident that anyone can handle even the toughest of background removing challenges.
This photo backgrounds change is very create you have included here some retouch process, just excellent
ReplyDeleteread my article here