Creating Smoke-like Effects

Step 2
Select the Polygonal Lasso Tool (L) and create an abstract shape that looks similar to the example shown below. Fill it with white (or any colors you wish your smoke to be).


Step 3
Now, to create the wavy smoke effect, go to Filter > Distort > Wave and set values as shown below:

Step 4
After you have used the Wave filter, you can go to Edit > Fade > Wave and set the opacity to 50% when the dialog box pops up.


Step 5
Repeat this distort and fade method for a few times to achieve the best results.

Step 6
Next, use the Smudge Tool (R) to reshape the smoke so that it looks more diffused and as if it is billowing out from the coffee beans (as shown below).


Step 7
Duplicate the Smoke Copy layer. Ctrl+Click on the layer to select it and go to Select > Modify > Contract: 7 pixels.


Step 8
Invert the selection (Ctrl+Shift+I) and press delete. It should have created a softer smoke effect now as compared to the other layer.

Step 9
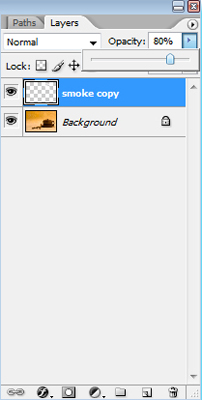
Adjust the opacity of Smoke Layer to 70% and Smoke Copy Layer to 50% before merging them. This will help soften the shape further.


Step 10
Duplicate the layer again and resize it. Ctrl+T to transform and click on the Warp tool to reshape the smoke.


Step 11
Next, go to Filter > Blur > Gaussian Blur, set radius : 3 pixels.


Set the layer opacity to 80%.

Step 12
To add more smoke on the beans, create a new blank layer and draw a shape around it using the Lasso Tool (L).

Go to Select > Feather > 15 pixels.


Step 13
Fill it in white and use the Eraser Tool (E) to reshape the smoke


Set the Smoke Copy Layer opacity to 80% and flatten the layers together.

This is the final image. Have fun trying it over a cup of steaming hot coffee!

Before & After

In this tutorial, we are going to take a look at how to create subtle smoke-like effect. Whether you want to add steam, mist or vapor to your photos, you'll definitely be putting this tutorial to good use from now on! Try it, the possibilities are endless!
Step 1
Open an image and create a new layer of it (Smoke Layer).
Step 2
Select the Polygonal Lasso Tool (L) and create an abstract shape that looks similar to the example shown below. Fill it with white (or any colors you wish your smoke to be).


Step 3
Now, to create the wavy smoke effect, go to Filter > Distort > Wave and set values as shown below:

Step 4
After you have used the Wave filter, you can go to Edit > Fade > Wave and set the opacity to 50% when the dialog box pops up.

Step 5
Repeat this distort and fade method for a few times to achieve the best results.

Step 6
Next, use the Smudge Tool (R) to reshape the smoke so that it looks more diffused and as if it is billowing out from the coffee beans (as shown below).


Step 7
Duplicate the Smoke Copy layer. Ctrl+Click on the layer to select it and go to Select > Modify > Contract: 7 pixels.


Step 8
Invert the selection (Ctrl+Shift+I) and press delete. It should have created a softer smoke effect now as compared to the other layer.

Step 9
Adjust the opacity of Smoke Layer to 70% and Smoke Copy Layer to 50% before merging them. This will help soften the shape further.


Step 10
Duplicate the layer again and resize it. Ctrl+T to transform and click on the Warp tool to reshape the smoke.


Step 11
Next, go to Filter > Blur > Gaussian Blur, set radius : 3 pixels.


Set the layer opacity to 80%.
Step 12
To add more smoke on the beans, create a new blank layer and draw a shape around it using the Lasso Tool (L).

Go to Select > Feather > 15 pixels.


Step 13
Fill it in white and use the Eraser Tool (E) to reshape the smoke


Set the Smoke Copy Layer opacity to 80% and flatten the layers together.

This is the final image. Have fun trying it over a cup of steaming hot coffee!

Before & After